STEP BY STEP GUIDE TO SETUP ACTIVE DIRECTORY ON WINDOWS SERVER 2012 BANGLA
স্টেপ বাই স্টেপ অ্যাক্টিভ ডিরেক্টরী ইন্সটল অন উইন্ডোজ সার্ভার ২০১২ আর-২ R2
আজ দেখাবো কিভাবে Active Directory Install করতে হয়।
Active Directory Install করার পূর্বে Windows Server Install করে নিতে হবে।আমাদের পুর্বের ব্লোগে বিস্তারিত দেওয়া আছে।আচ্ছা এভার শুরু করা যাক।
আমাদের প্রথমে দেখতে হবে,সার্ভার নাম ঠিক আছে কিনা, DNS install করা আছে কিনা এবং টাইম জোন এই সব খুবেই গুরুত্বপূর্ন।
১. কমম্পিউটার/সার্ভারের নাম পরিবর্তন এবং টাইম জোন পরিবর্তন করতে হবে, নিচের ইমেজে দেওয়া আছে,
২. এবার আসেন সবচেয়ে গুরুত্বপূর্ন বিষয় DNS ইন্সটল ও কনফিগারেশন করা। এখানে IPv4 ব্যবহার করব। একটা কথা মনে রাখতে হবে আপনি যে আইপি টা ব্যবহার করবেন সেটাই আপনার সার্ভারের DNS হিসেবে ব্যবহার করতে হবে অথবা লুপব্যাক আপনি ব্যবহার করবেন ,যেমন ঃ
IP Address: 192.168.10.1
Subnet Mask: 255.255.255.0
Gateway: You want to do
DNS: 192.168.10.1/127.0.0.1
DNS সব সময় আগেই ইন্সটল করে নিতে হবে আর না হয় Active Directory Install error আসবে।
প্রি-কনফিগারেশন ইন্সটল করার পর, এবার আসি মেইন কাজে।
৩. Start Server Manager and click here
৪. এবার Server Manager Dashboard থেকে add Roles and Features ক্লিক করতে হবে
৬. এখন আসবে ইন্সটল টাইপ, তাঁর মানে আপনি কোন টাইপ Install করবেন, এখানে দুইটা টাইপ থাকে
- Roles Based or Features Based
- Remote Desktop Service Install
এখানে পার্থক্য দেওয়া হল,
- Role-based or feature-based installation: this is the advanced option for installing RDS, it allows you to manually select the roles that you would like to install and manually configurethose roles, for example if you only need to install the "Remote Desktop Session Host" service to support using RDS in a Workgroup machine, or to allow more than 2 concurrent sessions, you may use the Role-based or feature-based installation process to only install that service.
- Remote Desktop Service installation: this is the new way of deploying RDS in Windows. Depending on the scenario that you choose, this way will select, install and configure all the needed components for you to help save time and effort. it usually installs the three basic roles that are 1) RD Connection Broker 2) RD Web Access and 3) RD Session Host, those roles can all be installed and configured remotely using a single wizard, which helps save time and effort in the deployment.
এখান থেকে আমরা বুঝতে পারি আমাদের জন্য Role-based or feature-based installation টা উপকারী
আমরা এখন Role-based or feature-based installation ফিচারটা ইন্সটল করব।
৭. এখন আসবে সার্ভার সিলেক্ট অপশন, এখানে আমরা যে সার্ভারে বা যে মেসিনে ইন্সটল করব সেটা সিলেক্ট করে দিতে হবে এবং Just click next to continue .
৯. ফিচার ইন্সটলের করার সময় গ্রুপ পলিসি অটো ইন্সটল হয়ে যাবে। এটা Active Directory এর ফিচার । click next to continue .
১০. এখানে Active Directory Domain Serviceনিয়ে কিছু কথা লেখা থাকে এবং কিছু নোট থাকে। সময় থাকলে ভাল করে পরে নিবেন, না পড়লেও কোন সমস্যা নাই। ক্লিক টু নেক্সট ...
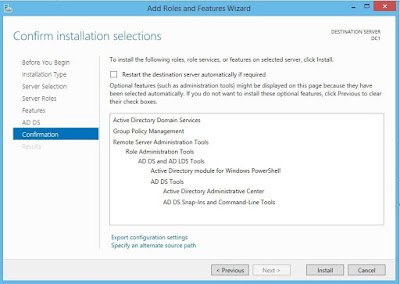
১১. আরেকটা কনফার্ম টপ আপ বক্স আসবে , এবং ইন্সটল এর জন্য অনুমতি চাইবে। Restart the Destination server automatically box এ ক্লিক করে দিতে হবে, তার অর্থ্য যখন ইন্সটল কমপ্লিট হবে সেটা অটোমেটিক রি-স্টার্ট নিবে। click to install
১২. Start Install ........
যখন ইন্সটল কমপ্লিট হয়ে যাবে তখন রি-স্টার্ট নিবে । এভাবেই Active Directory install করতে হয় ।


No comments